FAAS and Web based IDE
Certain product customization needs are too complex. These can not be handled by configuration alone. These customizations need to be encapsulated in some Functions. These Functions are then executed in a secured sandbox against certain events. The product now houses a Function as a Service (FAAS) platform
A product that has a Function as a Service (FAAS) embedded in them, would need a web based IDE to allow users to write and execute Functions.
Sounds familiar, AWS lambda is a classic example. AWS lambda is supported by an online web based IDE named AWS cloud9 IDE.
Web based IDE Solutions
In my search for a viable web based IDE for coding Functions, I came across Microsoft Monaco Editor.
There are few IDE solutions, I came across but I choose Microsoft Monaco Editor as it seems to satisfy my needs for Typescript language. It’s no surprise, since both the editor and the language is backed by Microsoft.
Note — Other IDE solutions I came across where were Ace and CodeMirror.
Features of Web based IDE Solutions
Following where the features I was targeting for my IDE
Support for Typescript Language
Support for import statements in the code with auto completion
Auto Completion to be backed by Typescript Definitions
Display Errors when Code is not compatible with Typescript Language
Display Errors when Code is not adhering to Typescript Type Definitions

React Monaco Editor
Demo — https://rohitghatol.github.io/react-monaco-editor-example/
Repo — https://github.com/rohitghatol/react-monaco-editor-example
Step 1. Create React App and Eject React Scripts
$>npm i create-react-app -g
$>create-react-app
$>cd app
$>npm eject
Step 2. Install react-monaco-editor
$> npm i react-monaco-editor -S
$> npm i monaco-editor-webpack-plugin -D
Edit app/config/webpack.config.js file
1. Add Import at the top
const MonacoWebpackPlugin = require('monaco-editor-webpack-plugin');
2. Add Plugin in the plugin space
new MonacoWebpackPlugin(),
Refer to webpack.config.js
Step 3. Write Simple Typescript Editor using react-monaco-editor
Refer to the following code. The key things to note here are
Import of react-monaco-editor
Usage of <MonacoEditor/> tag with attributes “language”, “value” and “theme”
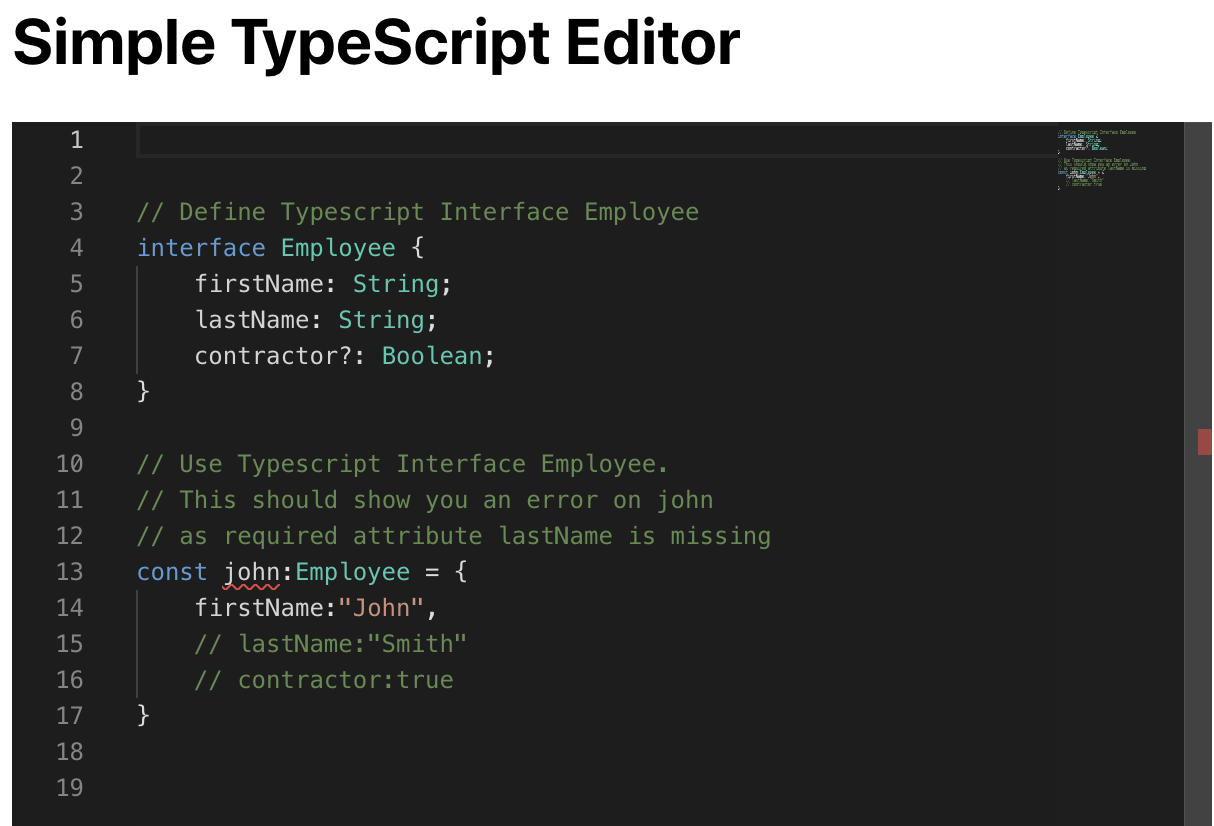
The Code which has the Interface definition and a const value using the Interface Definition
// Define Typescript Interface Employee
interface Employee {
    firstName: String;
    lastName: String;
    contractor?: Boolean;
}

// Use Typescript Interface Employee.
// This should show you an error on john
// as required attribute lastName is missing
const john:Employee = {
    firstName:"John",
    // lastName:"Smith"
    // contractor:true
}
SimpleTypescriptEditor.jsx
import React,{Component} from 'react';
import MonacoEditor from 'react-monaco-editor'

const code =
`

// Define Typescript Interface Employee
interface Employee {
    firstName: String;
    lastName: String;
    contractor?: Boolean;
}

// Use Typescript Interface Employee.
// This should show you an error on john
// as required attribute lastName is missing
const john:Employee = {
    firstName:"John",
    // lastName:"Smith"
    // contractor:true
}

`
export class SimpleTypescriptEditor extends Component {


    constructor(props){
        super(props);
        this.state = {
            code
        }
    }

    onChange(newValue, e) {
        // console.log('onChange', newValue, e);
    }

    render() {
        return (
            <MonacoEditor
                width="600"
                height="800"
                language="typescript"
                theme="vs-dark"
                defaultValue=''
                value={this.state.code}
                onChange={this.onChange}
            />
        )
    }
}
Demo — https://rohitghatol.github.io/react-monaco-editor-example/
Advanced Use case
See the example mentioned below. In this piece of code, we have imports from modules named “lambda”, “models” and “ramda”.
import {Event, Context} from "lambda";
import {Item, Result} from "models"
import * as R from "ramda";

export const lambda = async (event:Event, context:Context): Promise<Result[]> => {

    const result:Result[] = R.map((input:Item) => ({
        id: input.id,
        name: input.name,
        value: input.value
    }),event.input);

    return result;
}
In order to make this work we have to understand this, we have to visualize a folder structure
src/
   main.tsx
   node_modules/
       models/
           index.d.ts
       lambda/
           index.d.ts
       ramda/
index.d.tssrc/components/types index.js models.js lamdba.js ramda.js //index.js import {content as modelContent} from './models'; import {content as lambdaContent} from './lambda'; import {content as ramdaContent} from './ramda'; export const files = { "models/index.d.ts": modelContent, "ramda/index.d.ts": ramdaContent, "lambda/index.d.ts": lambdaContent, }; //models.js export const content = ` export interface Item { id: String; name: String; value: String; } export interface Result { id: String; name: String; value: String; } ` //lambda.js export const content = ` import {Item} from 'models'; export interface Event { input: Item[] } export interface Context { } `
Lets make necessary changes to our SimpleTypescript editor to make it support imports.
We need to add a callback handler called editorWillMount. In this callback function we will inject the type definitions file in monaco editor
editorWillMount(monaco) {

        // validation settings
        monaco.languages.typescript.typescriptDefaults.setDiagnosticsOptions({
            noSemanticValidation: false,
            noSyntaxValidation: false
        });

        // compiler options
        monaco.languages.typescript.typescriptDefaults.setCompilerOptions({
            target: monaco.languages.typescript.ScriptTarget.ES6,
            allowNonTsExtensions: true
        });

        for (const fileName in files) {
            const fakePath = `file:///node_modules/@types/${fileName}`;

            monaco.languages.typescript.typescriptDefaults.addExtraLib(
                files[fileName],
                fakePath
            );
        }


    }
In the options section we will provide a model. This model will ensure that the only created once.
const options = {
            selectOnLineNumbers: true,
            model: monaco.editor.getModel(Uri.parse("file:///main.tsx"))
                ||
                monaco.editor.createModel(code, "typescript", monaco.Uri.parse("file:///main.tsx"))
        }
<MonacoEditor
                width="800"
                height="800"
                language="typescript"
                theme="vs-dark"
                defaultValue=''
                value={this.state.code}
                onChange={this.onChange}
                editorWillMount={this.editorWillMount}
                editorDidMount={this.editorDidMount}
                options={options}
            />
Finally the complete code looks like this.
//AdvancedTypescriptEditor.jsx
import React,{Component} from 'react';
import MonacoEditor from 'react-monaco-editor'
import * as monaco from 'monaco-editor/esm/vs/editor/editor.api';
import {Uri} from 'monaco-editor/esm/vs/editor/editor.api';

import {files} from './typings';

const code =
`
//--------------------------
// Contents of "models"
//--------------------------
//
// export interface Item {
//    id: String;
//    name: String;
//    value: String;
// }
//
// export interface Result {
//    id: String;
//    name: String;
//    value: String;
// }

//--------------------------
// Contents of "lambda"
//--------------------------
//
// import {Item} from 'models';
//
// export interface Event {
//     input: Item[]
// }
//
// export interface Context {
//
// }


import {Event, Context} from "lambda";
import {Item, Result} from "models"
import * as R from "ramda";

export const lambda = async (event:Event, context:Context): Promise<Result[]> => {

    const result:Result[] = R.map((input:Item) => ({
        id: input.id,
        name: input.name,
        value: input.value
    }),event.input);

    return result;
}


`
export class AdvancedTypescriptEditor extends Component {


    constructor(props){
        super(props);
        this.state = {
            code
        }
    }

    onChange(newValue, e) {
        // console.log('onChange', newValue, e);
    }

    editorWillMount(monaco) {

        // validation settings
        monaco.languages.typescript.typescriptDefaults.setDiagnosticsOptions({
            noSemanticValidation: false,
            noSyntaxValidation: false
        });

        // compiler options
        monaco.languages.typescript.typescriptDefaults.setCompilerOptions({
            target: monaco.languages.typescript.ScriptTarget.ES6,
            allowNonTsExtensions: true
        });

        for (const fileName in files) {
            const fakePath = `file:///node_modules/@types/${fileName}`;

            monaco.languages.typescript.typescriptDefaults.addExtraLib(
                files[fileName],
                fakePath
            );
        }


    }


    editorDidMount(editor, monaco) {
        editor.focus();
    }

    render() {
        const options = {
            selectOnLineNumbers: true,
            model: monaco.editor.getModel(Uri.parse("file:///main.tsx"))
                ||
                monaco.editor.createModel(code, "typescript", monaco.Uri.parse("file:///main.tsx"))
        }
        return (
            <MonacoEditor
                width="800"
                height="800"
                language="typescript"
                theme="vs-dark"
                defaultValue=''
                value={this.state.code}
                onChange={this.onChange}
                editorWillMount={this.editorWillMount}
                editorDidMount={this.editorDidMount}
                options={options}
            />
        )
    }
}
The Editor looks as follows